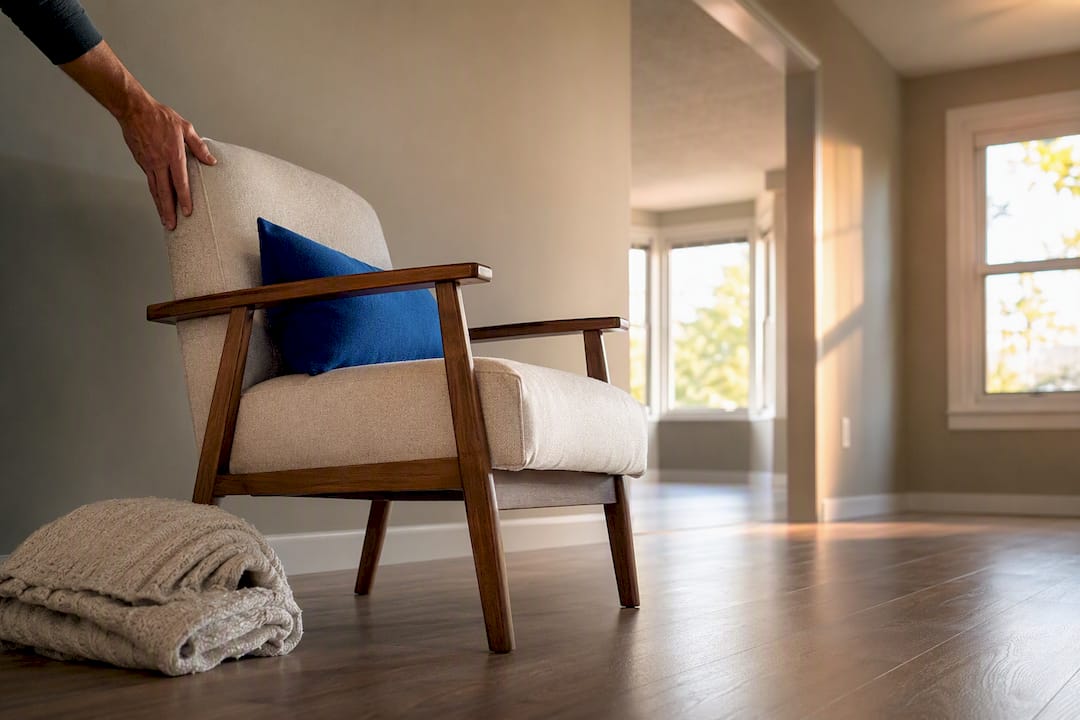
The photos that rent units fastest are bright, interior focused, wide angle shots, led by a single hero image and backed by 10 to 20 supporting photos. A modern smartphone handles this job well. Staging and natural light do more for your results than any camera upgrade, so spend your prep time there instead of shopping for gear.
TL;DR:
- The best rental listing photos include a wide-angle hero shot of the main living space, a second living angle, and a kitchen shot, totaling 12 to 20 images.
- Modern smartphones paired with steady framing and good lighting are sufficient for most rental photos, with DSLR preferred only in difficult lighting conditions.
- Staging efforts like decluttering and adding minimal props can dramatically improve photo quality, especially in occupied units, while respecting tenant privacy and consent.
- The primary photo should be the interior shot, as it generates significantly more inquiries than exterior images, and editing should be simple, consistent, and focus on exposure and white balance.
- Avoid poorly lit, cluttered, or distorted photos, and periodically revisit and update the hero image to maintain listing performance and reduce vacancy times.
Table of Contents
- What Are the Must-Have Rental Listing Photos?
- What Equipment and Camera Settings Work Best?
- How Should You Stage a Unit Before Shooting?
- How Do You Photograph Each Room Type?
- When Is the Best Time to Shoot for Good Light?
- What's the Fastest Way to Edit and Upload Photos?
- Should You DIY the Photos or Hire a Professional?
- Which Photos Should You Avoid, and What About Tenant Consent?
- Who Owns the Rights to Your Rental Photos?
- Is Virtual Staging Worth It for Empty Units?
- What Mistakes Wreck an Otherwise Good Photo Set?
- What Actually Moves the Needle on Leasing Speed
- How Milwaukeepm Handles Listing Photos and Marketing for You
- Sources
What Are the Must-Have Rental Listing Photos?
Every strong listing follows a similar shot order, and the order matters almost as much as the shots themselves. A 12 to 20 photo range performs best across most rental listings, according to Houfy's shot checklist research, giving prospective tenants enough detail without burying them in redundant angles.
Here's the priority order to shoot in, with the job each image needs to do:
- Hero interior shot. Usually the living room or main living space, shot wide from a corner. Its job is to earn the click. Stand in the doorway or the room's back corner to capture the widest usable span.
- Living room, second angle. Shows scale and flow from a different corner. Helps a renter mentally place furniture.
- Kitchen, wide angle. Establishes function and counter space. Shoot from the entry point so appliances and counters are all visible in one frame.
- Primary bedroom. Shows the bed placement and window light. Frame so the bed and at least one window are both visible.
- Primary bathroom. Builds trust in cleanliness. Shoot at an angle that avoids catching your own reflection in the mirror.
- Second bedroom or office nook. Demonstrates flexibility of the floor plan. A wide corner shot works here too.
- Exterior front, head-on. First impression for anyone cross-checking the address. Shoot straight on, centered on the entry.
- Exterior, corner angle. Adds depth and shows the building's full footprint.
- Outdoor amenity. A patio, pool, or shared yard. Shoot during good light to avoid a flat, gray look.
- Laundry area or in-unit closet. A practical detail that answers a question renters always ask.
- Storage or garage space. Especially valuable in markets where parking is scarce.
- Neighborhood or building amenity. A gym, lobby, or mailroom shot builds context.
- Detail shots. Close-ups of finishes, updated appliances, or a fireplace. Optional, but useful for higher-end units.
That list covers the core essentials. If your unit has a standout feature, like a view or a renovated kitchen, add one more detail shot rather than cutting from the list above.
What Equipment and Camera Settings Work Best?
You don't need a professional camera to produce solid rental property images. Modern smartphones are sufficient for most listing photos when paired with good composition and steady framing, according to Apartments.com's photography guidance. A DSLR only pulls ahead when a unit has tricky lighting, like a dim basement apartment or a room with one small window fighting a bright exterior view.
- Smartphone users: Brace your elbows against your torso to cut motion blur, or use a small tripod if you own one.
- DSLR or mirrorless users: A wide-angle lens (16 to 24mm equivalent) captures a full room without the fisheye distortion that makes ceilings and walls curve unnaturally.
- Shooting height: Aim for roughly 4 to 5 feet, keeping the camera parallel to the walls. Turn on your camera's gridlines. This alone fixes most amateur composition mistakes.
- Camera settings: Low ISO (100 to 400) keeps images clean, and a mid aperture (f/8 to f/11) keeps most of the room in focus.
- HDR versus single exposure: Bracket three exposures for rooms with strong window light, or shoot one exposure and lift shadows carefully in editing.
- Export size: Save final images at roughly 2048 pixels on the long edge, which keeps files sharp without bloating upload times.
Quick stat: Modern smartphones paired with a tripod or firm bracing produce results close to a dedicated camera for most standard units, per Apartments.com's own recommendations to landlords.
How Should You Stage a Unit Before Shooting?
Staging is where five minutes of effort changes a listing's entire impression. Small, low-cost staging touches, like fresh towels or a plant in a bare corner, noticeably help renters picture themselves living there, according to Apartments.com's guidance on staging for rental photos.
Before you pick up the camera:
- Clear counters, tables, and floors of everyday clutter.
- Wipe down kitchen and bathroom surfaces so they catch light instead of grime.
- Open every curtain and blind, and turn on interior lamps even during the day.
- Add one or two low-cost staging props, such as a folded throw blanket, a small plant, or matched towels.
- Straighten rugs and push in dining chairs so sightlines look intentional, not accidental.
Pro Tip: Keep a small staging kit in your car, plants, towels, a throw pillow, so you're never scrambling to borrow decor before a shoot.
Tenant-occupied units need a different approach entirely. Give at least 24 hours' written notice before entering to shoot, as most lease agreements require. Ask tenants to clear personal items, photos, laundry, and mail, from visible surfaces, and consider offering a small incentive, like a gift card, in exchange for a tidy walkthrough window.
Empty units bring their own challenge: bare rooms photograph smaller than they are. Add one staging item, a single chair or a folded blanket on the floor, so viewers have a size reference. Shoot closets and storage areas as their own separate images rather than trying to capture them inside a wider room shot.
How Do You Photograph Each Room Type?
Different rooms need different framing strategies, and treating them all the same way is where a lot of amateur photo sets fall apart.
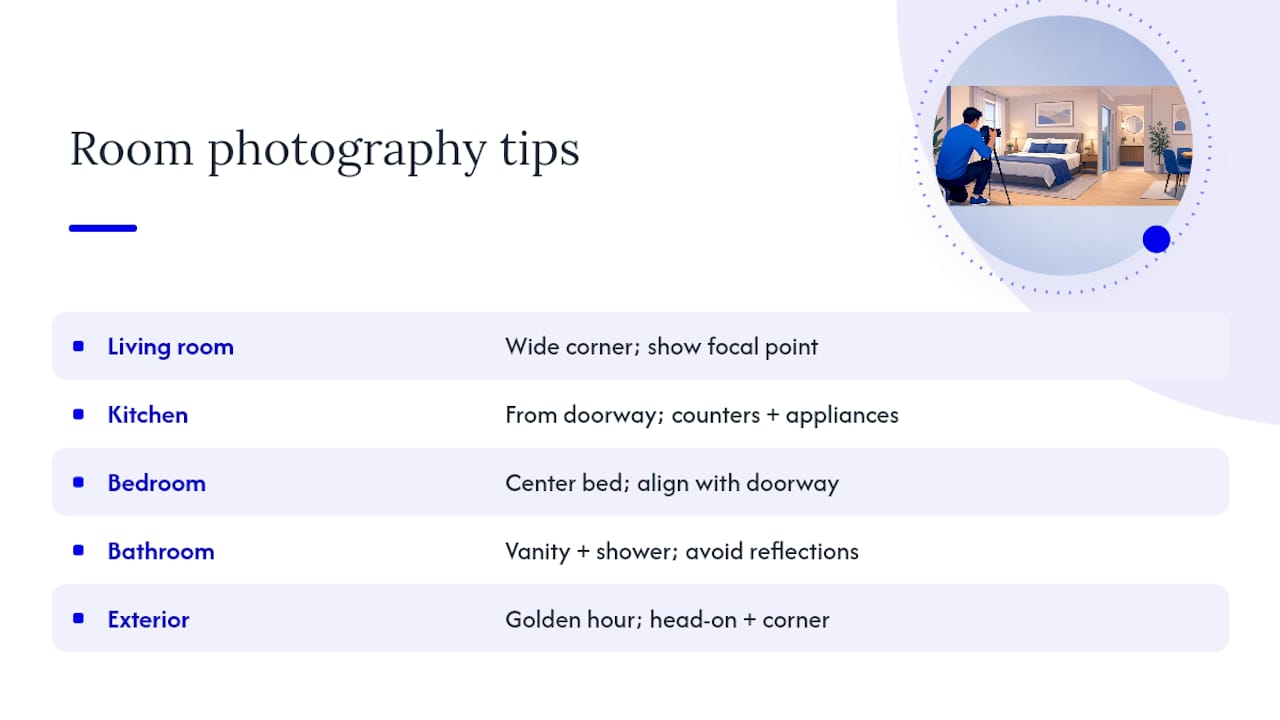
Living room. Shoot from the room's widest corner to capture traffic flow and a focal point, a fireplace, a window, or a piece of furniture the eye lands on naturally.
Kitchen. Angle from the doorway or an open corner so counters and appliances share the frame. Clear the counters first; a coffee maker and one bowl of fruit is plenty of styling.
Bedroom. Center the bed and align your shot with the doorway for a clean sightline. If the closet is small or awkwardly placed, photograph it separately rather than cramming it into the main frame.
Bathroom. Close the toilet lid, and angle away from mirrors to avoid catching your own reflection. When the room allows it, frame the vanity and shower in a single shot so the layout reads clearly.
Exterior. Shoot during golden hour, the hour after sunrise or before sunset, for warm, flattering light. Capture at least two angles, a head-on shot and a corner shot, plus any yard or shared amenity space.
When Is the Best Time to Shoot for Good Light?
Timing affects rental property images more than almost any other variable you control. Exteriors look their best during golden hour, when low, warm sunlight avoids the flat glare of midday shooting. Interiors work differently: mid-morning to early afternoon usually delivers the most even, usable natural light across a full room.
A few practical rules keep your lighting consistent:
- Avoid mixing strong daylight with warm indoor lamp light in the same shot. It creates a color cast that reads as unprofessional.
- Use sheer curtains or partially closed blinds to soften harsh glare from direct sun, rather than shooting with blinds fully open at noon.
- Bracket exposures, or shoot one frame and lift shadows in editing, when a room has both bright windows and dim corners in the same shot.
- Skip shoot days that are heavily overcast or rainy when exteriors are on your list; reschedule if you can.
What's the Fastest Way to Edit and Upload Photos?
Editing should take about two minutes per photo, not twenty. A conservative edit, straighten, correct exposure, adjust white balance, and lift shadows slightly, keeps images looking accurate rather than artificial, per Greenmoov's editing guidance for rental listings. Skip filters entirely. A renter who shows up to a unit that looks noticeably different from its photos is a renter who leaves an unhappy review.
- Straighten any tilted vertical lines, walls and door frames especially.
- Correct exposure so whites look white, not blown out or gray.
- Adjust white balance if indoor lighting cast a yellow or blue tint.
- Export at roughly 2048 pixels on the long edge, JPEG format, in the 3 to 15MB range for most listing platforms.
Quick stat: Choosing an interior shot as your primary photo matters more than most landlords realize. Living-room primary photos generate a 110% higher click-through rate than exterior primary photos, based on CoStar research cited by Apartments.com, while pool primary photos see a 20% lift. Save your best exterior shot for the second or third slot instead.
Video or a 360 tour is worth adding for higher-end or competitive units, since virtual tours tend to increase engagement on listings that already have strong still photos.
Should You DIY the Photos or Hire a Professional?
Most standard units don't need a professional photographer. But a few signals suggest it's worth the cost:
- Your listing has been live for over a week with few inquiries.
- The unit is a high-end property where buyers expect polished imagery.
- You manage enough units that a bulk photography package makes financial sense.
- The space has genuinely difficult lighting, deep interior rooms, mismatched window exposure, or heavy shadows you can't fix with editing.
Professionals typically bring HDR blending, floor plans, virtual staging, and sometimes 360 tours, tools that go beyond what a phone and a two-minute edit can achieve. If a listing gets consistently poor views after posting, updating the photos, or bringing in a pro, is one of the fastest ways to turn that around.
Pro Tip: If you're weighing the cost of a photographer against your time, factor in vacancy days. A unit that leases a week faster because of better photos often pays for the photo shoot several times over.
This is also where bundling photography into full marketing and leasing services pays off, which is exactly the kind of task a rental property marketing strategy is built to handle alongside tenant screening.
Which Photos Should You Avoid, and What About Tenant Consent?
Skip anything that misrepresents the unit. Stock photos, outdated images from a previous renovation, or heavily filtered shots that shift colors unnaturally all create a gap between the listing and the walkthrough, and that gap is exactly what generates bad reviews and wasted showings. Avoid cluttered frames, shots taken in the dark, blurry images from handheld low-light shooting, and any photo that includes a mirror catching your reflection or your phone.
Personal items deserve special caution. If a tenant currently lives in the unit, never photograph family photos, mail with visible names or addresses, medications, or other identifying items left in frame, even accidentally.
Consent matters just as much as composition. Most leases require at least 24 hours' written notice before entry for any purpose, including photography, and that notice should specify the date and general time window. Put the request in writing, by text or through your tenant portal, rather than relying on a verbal heads-up. Ask the tenant directly whether they're comfortable having certain rooms photographed; some tenants are fine with common areas but prefer their bedroom skipped. Respecting that preference costs you nothing and avoids a tenant relations problem down the line.
If the tenant is moving out soon, it's often easier to schedule the shoot for the day after move-out, once the unit is empty and cleaned, rather than trying to shoot around someone else's belongings.
Who Owns the Rights to Your Rental Photos?
Ownership depends entirely on who pressed the shutter, and mixing this up creates real legal exposure. If you take the photos yourself, on your own phone or camera, you own the copyright outright and can use them across any listing platform without restriction.
Hiring a photographer changes that by default. Under standard copyright law, the photographer retains rights to the images unless your contract specifies otherwise. Always get a written agreement granting you a license to use the photos for listing and marketing purposes, ideally one that doesn't expire or restrict which platforms you can post to. Verbal agreements are not enough if a dispute ever comes up.
The same logic applies in reverse: never pull photos from a previous listing, a real estate site, or another landlord's post to use as your own, even if the unit looks similar to yours. That's a copyright violation regardless of intent, and platforms increasingly flag reused or stock imagery during listing reviews.
If you use a virtual staging service or an AI enhancement tool, read the terms of service before uploading. Some platforms claim broad rights to process or reuse submitted images, which matters if your unit's interior includes anything you'd rather not have appear elsewhere. When in doubt, keep a folder of your original, unedited files as proof of authorship and date, useful protection if a usage dispute ever surfaces.
Is Virtual Staging Worth It for Empty Units?
Virtual staging solves a specific problem: an empty room photographs smaller and less inviting than a furnished one, but buying furniture for a shoot rarely makes financial sense for a single rental unit. Digital staging tools add furniture, rugs, and decor to photos of an empty room, giving prospective tenants a sense of scale and livability without any physical setup cost.
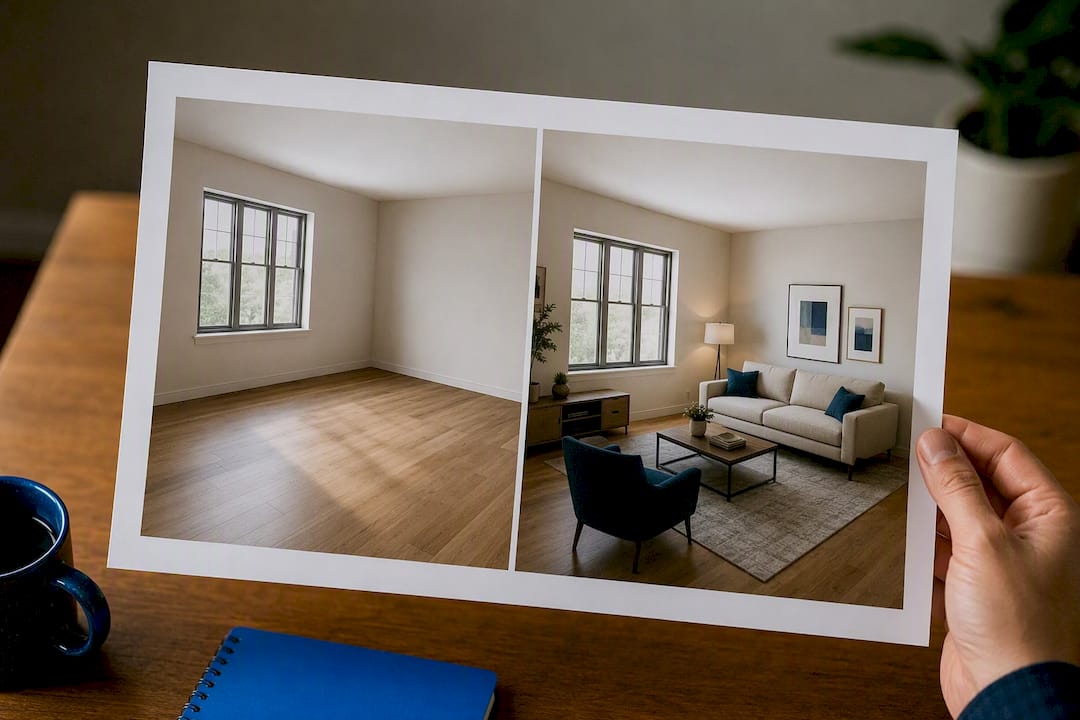
Used well, virtual staging works best on primary living spaces, living rooms, primary bedrooms, and dining areas, where an empty room's proportions are hardest to read. It's less useful for kitchens and bathrooms, where actual fixtures and finishes matter more than furniture context.
A few practical guardrails matter here. Always disclose that a photo is virtually staged, either directly in the caption or clearly in the listing description. Undisclosed staged photos that look like real furniture create the same trust problem as outdated or misleading images: a tenant walks in expecting furniture that was never actually part of the unit. Most listing platforms also require this disclosure directly, so skipping it risks a takedown, not just an awkward showing.
Keep the staging realistic in scale and style. Oversized furniture in a small room, or a decor style wildly mismatched to the building's actual character, undermines the trust the photos are supposed to build. A simple, neutral staging style, a couch, a rug, a coffee table, generally performs better than an elaborate design that draws attention to itself rather than the room.
Virtual staging pairs well with real detail shots. Stage the wide room shots, but keep your close-up images, kitchen counters, bathroom fixtures, closet space, as real, unedited photography.
What Mistakes Wreck an Otherwise Good Photo Set?
The same handful of mistakes show up across most weak rental listings, and nearly all of them are fixable in minutes.
Poor lighting is the most common one. Dark, shadowy interior shots make even a beautiful unit look uninviting. Fix it by shooting during daylight hours with curtains open and lamps on.
Cluttered frames come in second. Dishes in the sink, laundry on the bed, or a crowded counter distract from the space itself. A five-minute declutter pass before shooting solves this every time.
Vertical distortion is a subtler problem. Shooting too close with a wide lens makes walls lean and ceilings bulge unnaturally. Back up, use gridlines, and keep the camera level.
Too few or too many photos both hurt performance. Fewer than eight photos leaves renters with unanswered questions; more than twenty starts to feel repetitive and buries your strongest shots.
Choosing the wrong hero photo is an easy trap. Exterior shots feel like the obvious cover image, but interior primary photos consistently draw more clicks, as covered above.
Inconsistent editing across a photo set, some warm, some cool, some overexposed, makes a listing look disorganized even when each individual shot is fine. Run a consistent, light edit across the whole batch before uploading.
What Actually Moves the Needle on Leasing Speed
Good listing photos shorten vacancy periods, but the biggest gap I see isn't camera quality, it's owners treating photography as a one-time task instead of a marketing decision. The single highest-leverage habit: revisit your primary photo after the first week. If views are flat, swap the hero image before you touch price.
— Chaim
How Milwaukeepm Handles Listing Photos and Marketing for You
Shooting your own rental listing photos works fine for a single unit and a free afternoon. It gets a lot harder once you're juggling multiple properties, tenant turnover schedules, and marketing timelines on top of everything else landlords manage day to day. A property management service can handle the entire workload as part of full leasing services, coordinating photography, listing placement, and tenant screening so your unit gets in front of qualified renters without you managing the camera, the editing, or the posting schedule yourself.
That means less time spent staging rooms and more time reviewing pre-screened applicants, backed by a tenant guarantee for the first year of a lease. If you'd rather hand off the entire marketing and leasing process, from photos to move-in, take a look at Milwaukeepm's property management services and see what a done-for-you leasing timeline looks like for your property.
Sources
- Apartments
- Vacation Rental Photo Checklist: 12 Must-Have Shots — Houfy
- Rental Property Photography: Shoot Like a Pro on a Budget — Rentalot
- How to Take Pro Photos for Rental Listings — Greenmoov