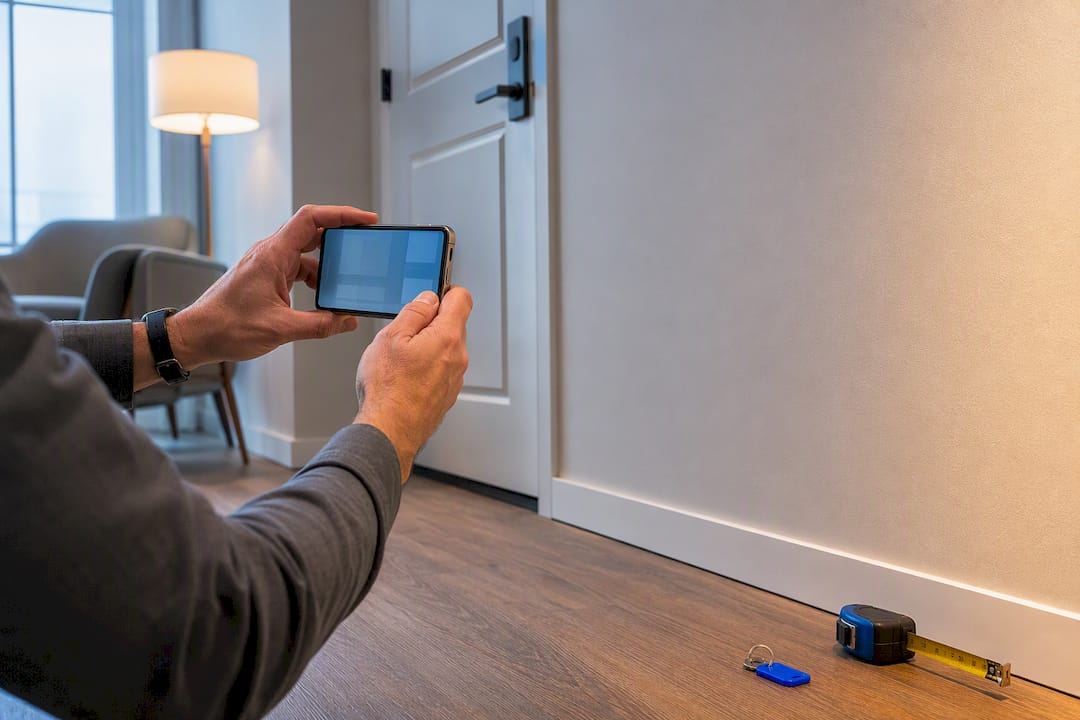
Complete a room-by-room move-in inspection checklist with photos or video on or before your first day in the unit, then get your landlord's signature or send the signed form and images by email or certified mail. This single habit protects you three ways: it creates a timestamped record of existing damage, it shifts the burden of proof in most deposit disputes onto whoever can't produce documentation, and it gives you a baseline to compare against at move-out. Keep the originals, back them up to the cloud, and record your utility meter readings and key or fob count while you're at it.
TL;DR:
- Proper documentation of move-in conditions with timestamped photos and signatures shifts the burden of proof and protects tenants in deposit disputes.
- Photographing key items such as keys, utility meters, and appliances at move-in is crucial, alongside room-by-room detailed inspections with wide and close-up shots.
- Organized files, including signed checklists and backing up evidence to the cloud, are essential, with narrated videos providing additional proof of condition.
- Understanding state-specific deposit return deadlines and acting promptly with comprehensive records can prevent losing eligible deposit refunds.
- Using managed services for inspections, or following a consistent, detailed approach yourself, ensures reliable records and minimizes disputes across multiple units or distant properties.
Table of Contents
- Your One-Page Move-In Inspection Checklist Template
- The Complete Room-by-Room Inspection Checklist
- How to Document Evidence That Actually Holds Up
- Normal Wear and Tear vs. Chargeable Damage (And Why Your Deadline Matters)
- What to Do When Your Landlord Won't Sign or Show Up
- Turning Your Move-In Record Into a Move-Out Win
- How Professional Property Managers Handle Move-In Inspections
- What Actually Protects Your Deposit (and What's Overrated)
- Hire It Out: How Milwaukeepm Handles Move-In Documentation for You
- Where to Download the Official Checklists and Forms
- Sources
- FAQ
Your One-Page Move-In Inspection Checklist Template
You don't need a law degree or a fancy app to protect your deposit. You need ten minutes, a phone camera, and a system you'll actually follow before the boxes pile up and the walkthrough gets forgotten.
The simplest version of this process comes down to three steps, repeated in every room: Check, Photo, Sign. Look at the space, photograph what you see, and note anything questionable directly on your form. Skip the step where you tell yourself you'll "remember it later." You won't, and neither will your landlord.
Before you walk a single room, prioritize these five items because they cause the most disputes and the most safety concerns:
- Keys and fobs. Count every key, fob, and garage remote you receive and match it to what's listed in your lease.
- Utility meters. Photograph the electric, gas, and water meter readings the day you get access.
- Smoke and carbon monoxide detectors. Test each one and note whether it's hardwired, battery operated, or missing entirely.
- Locked doors and windows. Confirm every exterior door and window latches and locks properly.
- Major appliances. Turn on the range, run the dishwasher for thirty seconds, and open the fridge and freezer to confirm they're cold.
From there, work room by room using this quick sequence:
- Stand in the doorway and take two wide shots capturing the whole room from opposite corners.
- Walk the perimeter and photograph close-ups of any marks, stains, cracks, or wear.
- Open every closet, cabinet, and drawer and photograph the interior if it shows damage.
- Test light switches, outlets, and any ceiling fixtures.
- Write a one-line note on your checklist for anything that isn't in perfect condition.
Minimum photo rule: take at least two wide-angle shots per room plus a close-up of every flaw you find. If your phone doesn't automatically timestamp images, either turn that setting on or hold up a phone displaying the date and time in the first frame of each room.
You don't have to build this template from scratch. The Appendix 5: Move-In/Move-Out Inspection Form from HUD is a widely used, government-backed starting point that covers every major room category. Zillow offers a free Rental Move-In and Move-Out Checklist PDF built for exactly this kind of same-day documentation. If you'd rather fill out a form digitally and attach photos directly to it, DepositHawk's fillable inspection tool lets you generate a signed, room-by-room record without printing anything.
Pro Tip: Print two copies of whichever template you choose before move-in day. Sign both with your landlord on the spot if possible, keep one, and hand over the other. A wet signature obtained in person beats a delayed email every time.
The Complete Room-by-Room Inspection Checklist
A generic "walk through and take pictures" instruction isn't specific enough to hold up if a dispute ever reaches small claims court. What actually protects you is a room-by-room checklist paired with notes precise enough that a stranger, including a judge, could read them and understand exactly what you saw.
Entry and hallway
Start at the front door before you even step inside. Check the door hardware, deadbolt, and peephole. Photograph the floor condition in the entry hallway, since this area takes the most foot traffic and shows the most wear. Test every light switch along the hallway and note your mailbox number and any assigned parking space.
- Door locks and deadbolt function properly
- Weatherstripping intact, no gaps under the door
- Hallway flooring free of major stains, gouges, or loose tile
- Light switches and hallway fixtures operational
- Mailbox key works and parking assignment matches lease
Example note: "Front door deadbolt sticks, requires two turns to lock. Hallway carpet has 3-inch stain near closet door, photographed."
Living areas
Walls, floors, and windows take center stage here because they're the largest surfaces in the home and the easiest to argue about later. Photograph every wall for nail holes, scuffs, or paint damage. Check that blinds raise and lower smoothly and that windows open, close, and lock. Test every outlet with your phone charger, and confirm the HVAC vents are open and not blocked by paint or debris.
- Walls free of holes, cracks, or water stains
- Windows open, close, and lock; screens intact
- Blinds or curtains functional, no broken slats
- All outlets tested and functional
- Ceiling fixtures and fans operational
- HVAC vents unobstructed and airflow present
Example note: "Living room window, north wall, screen has 2-inch tear in lower corner. Ceiling fan wobbles at high speed."
Kitchen
The kitchen generates more move-out disputes than almost any other room, largely because appliances and cabinets show wear that's easy to overlook on day one and easy to blame on the incoming tenant later. Open the fridge and freezer and check the seals. Run the range on every burner and check the oven for cleanliness and function. Run the dishwasher through a short cycle if possible. Open every cabinet and drawer, inside and out, and photograph the countertops for existing scratches or chips.
- Refrigerator and freezer cool properly, door seals intact
- Range burners ignite, oven heats, no gas smell
- Dishwasher runs and drains without leaking
- Cabinet doors and drawers open smoothly, interiors clean
- Countertops free of chips, burns, or deep scratches
- Sink drains properly, disposal runs without jamming or noise
- Faucet has no leaks under the sink
Example note: "Kitchen countertop, left of sink, has existing 1-inch burn mark. Disposal runs but makes rattling noise when engaged."
Bathrooms
Grout, caulk, and water pressure are the three things renters almost always forget to check and almost always get blamed for later. Run the shower and tub and check for leaks around the base. Inspect the grout and caulk lines for mold or gaps. Flush the toilet and check the wax seal at the base for movement. Turn on the exhaust fan and confirm it actually pulls air. Open the medicine cabinet and vanity for interior damage.
- Tub and shower drain properly, no standing water
- Grout and caulk free of mold, cracking, or missing sections
- Toilet flushes fully, no rocking or leaking at the base
- Exhaust fan runs and vents audibly
- Mirror and medicine cabinet free of cracks
- Water pressure adequate in both sink and shower
Example note: "Bathroom caulk along tub edge cracked in three spots, approximately 6 inches total. Photographed and dated."
Bedrooms
Closets and carpets carry the most existing wear in bedrooms, and they're also the easiest spots to miss during a rushed walkthrough. Open every closet door and check the track and hardware. Inspect window screens for tears. Test the ceiling fan on every speed. Get down at eye level with the carpet in natural light, since stains often hide under normal indoor lighting.
- Closet doors slide or swing without sticking
- Windows and screens intact, locks functional
- Ceiling fan operates on all speeds without noise
- Outlets tested near desk and bed areas
- Carpet or flooring free of stains, burns, or tears
Example note: "Bedroom 2 carpet, near window, has faint discoloration approximately 8 by 10 inches, likely from prior sun exposure."
Exterior and shared areas
If your unit has a balcony, patio, storage locker, or assigned parking, photograph all of it on day one. Shared entry systems, intercoms, and building access fobs also belong on your checklist since they're easy to overlook until you actually need them.
- Balcony or patio surface, railing, and drainage in good condition
- Storage unit or locker accessible with working lock
- Assigned parking space matches lease terms
- Building entry system, intercom, and fobs functional
- Shared hallway and stairwell lighting operational
Example note: "Balcony railing loose at northeast post, moves approximately half an inch when pushed."
How to Document Evidence That Actually Holds Up
A photo without context is weak evidence. A photo with a timestamp, a wide shot for orientation, and a close-up of the specific flaw is something a property manager or a small claims judge can actually evaluate.
Shoot every room the same way: one or two wide-angle shots that show the whole space, followed by close-ups of anything questionable. If your phone doesn't automatically embed a timestamp in the image metadata, either turn that feature on in your camera settings or record a short narrated video instead. A narrated walkthrough often beats still photos entirely, since it captures ambient details a photo can't, like a rattling window fan, a loose cabinet hinge, or a running toilet you'd otherwise never notice until the water bill arrives.
Never apply filters or edits to your originals. Export copies for sharing and keep the raw files untouched, since an edited photo is easier to challenge than an untouched one.
Metadata matters more than most renters realize. Your phone's camera app typically embeds the date, time, and sometimes GPS location directly into the photo's EXIF data. You can usually verify this by checking the photo's "details" or "info" panel. If you're not confident your device is capturing this automatically, a low-tech backup works fine: hold up a phone displaying the current date and time in the first frame of your video or photo series.
Store your evidence in at least two places. Upload everything to a cloud folder immediately, and email a copy to your landlord or property manager the same day. This does double duty: it backs up your files, and it creates a timestamped delivery record showing exactly when you sent it. Name your files to match your checklist item numbers so nothing gets lost in a folder of two hundred generic image files.
- Upload photos and video to cloud storage the same day you shoot them
- Email a copy to your landlord immediately after the walkthrough
- Keep a physical or PDF copy of the signed checklist
- Label files by room and item number, not by generic timestamps
- Retain the raw, unedited video or photo file indefinitely
Pro Tip: Record a single continuous narrated video walking through the entire unit before you take a single still photo. It takes five minutes, and it becomes your backup evidence if any individual photo later gets challenged as out of context.
Normal Wear and Tear vs. Chargeable Damage (And Why Your Deadline Matters)
Landlords can't legally deduct for normal wear and tear from a security deposit, but the line between "wear" and "damage" is where most disputes actually happen. Faded paint from sunlight, worn carpet in a high-traffic hallway, and small nail holes from hanging pictures are typically considered normal wear. A missing chunk of drywall, a burn mark on a countertop, or pet stains soaked into carpet padding are typically considered chargeable damage.
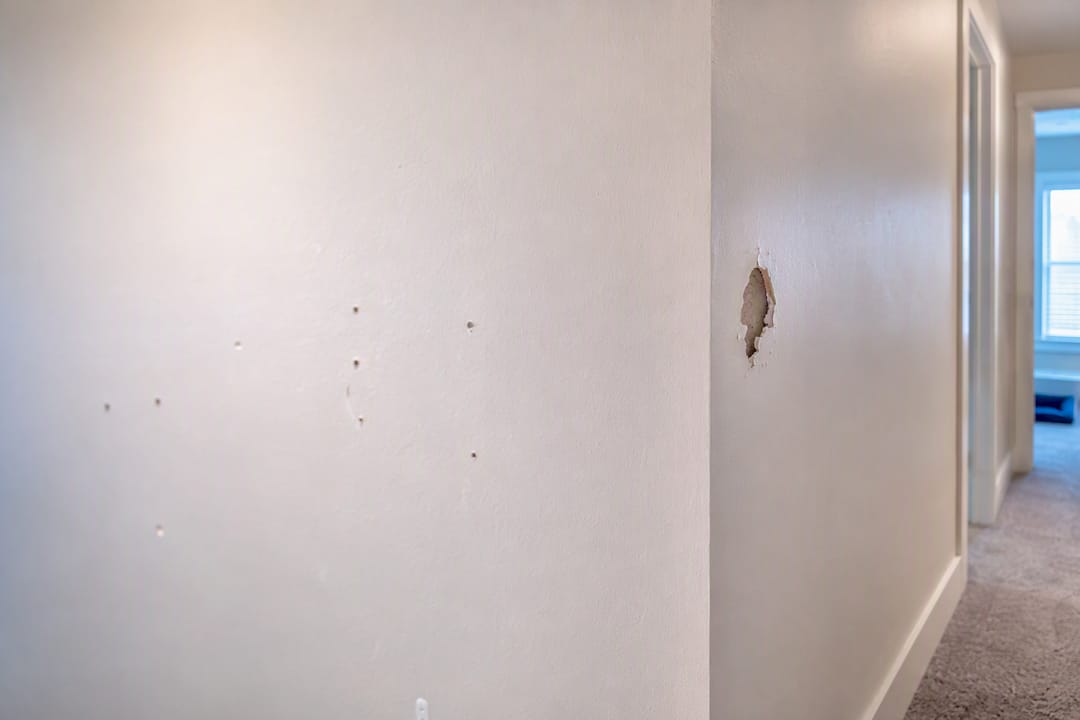
The difference usually comes down to whether the change resulted from ordinary living or from neglect, accident, or abuse. A carpet that's simply worn thin after three years of foot traffic is wear. A carpet with a bleach stain from a cleaning accident is damage. Your move-in photos are what let you prove which category a given mark falls into, because they show whether it existed before you ever moved a piece of furniture into the room.
Timing is where a lot of tenants lose money they're legally owed, simply because they don't know their state's deadline. Deposit-return timelines vary significantly by state, so treat the following as illustrative examples rather than a substitute for checking your own state's law:
- New York commonly requires landlords to return deposits or provide an itemized statement within 14 days of move-out.
- California typically gives landlords 21 days to return the deposit or provide an itemized statement of deductions.
- Texas generally allows landlords 30 days to return the deposit after the tenant vacates.
- Washington commonly requires a response within 21 days as well, though local ordinances can shorten that window.
These examples exist to show you the range, not to tell you your exact deadline. State and even city rules shift often enough that you should verify the current requirement for your specific location before assuming any of these numbers apply to you.
What actually matters more than the exact day count is this: a signed, timestamped move-in checklist with dated photos tends to shift the practical burden of proof onto whoever can't produce comparable documentation. If your landlord claims a stain existed before you moved in and you have a dated photo from move-in day showing a clean carpet, the paper trail speaks louder than either party's memory. Courts and deposit-review processes consistently favor the party who can show contemporaneous, dated evidence over the party who can only offer a verbal account months later.
What to Do When Your Landlord Won't Sign or Show Up
Not every landlord treats move-in documentation as seriously as they should, and some will skip the walkthrough entirely or refuse to sign anything you present. That doesn't mean you're out of options. You can still build a record that holds up, you just have to do more of the legwork yourself.
- Complete the checklist alone. Walk every room using the same room-by-room process outlined earlier, and don't skip a single category just because no one's confirming it with you.
- Photograph and video everything. Since there's no second party to corroborate your findings, your visual evidence needs to be more thorough, not less. Shoot extra close-ups of anything even slightly questionable.
- Note the refusal directly on the form. Write something specific: "Landlord [name] declined to attend walkthrough on [date] despite two requests via text on [dates]." Specificity beats a vague complaint.
- Send the complete package the same day. Email your signed checklist, all photos, and your notes to your landlord or property manager immediately, and follow up with a certified mail copy if the relationship already feels adversarial.
- Keep every delivery receipt. Save the email timestamp, the certified mail tracking number, and any read receipts. These become your proof that you tried to create a shared record even when your landlord didn't cooperate.
- Log witnesses if anyone was present. A roommate, a friend helping you move, or a maintenance worker who happened to be there can later confirm what you documented.
If a landlord's refusal becomes a pattern, or if you sense a dispute brewing before you've even unpacked, escalate early rather than waiting. Most states or cities have a local tenant-landlord agency or housing authority that can advise you on your specific rights, and small claims court remains an option if a deposit dispute eventually goes that far. Bring your complete packet: the checklist, every photo with its timestamp, delivery receipts, and any written communication showing your landlord's refusal to participate.
Pro Tip: If your landlord won't respond to your emailed checklist within a reasonable window, send a second email referencing the first one by date. A documented pattern of good-faith attempts to communicate carries real weight if you ever need to explain your side to a mediator or judge.
Turning Your Move-In Record Into a Move-Out Win
Your move-in checklist isn't just paperwork you file away and forget. It's the baseline your entire move-out inspection depends on, and the tenants who get their full deposit back are almost always the ones who treat these two documents as a matched pair.
When move-out day arrives, walk through the unit using the same sequence and, where possible, the same camera angles you used at move-in. Standing in the same spot and shooting the same wall or corner makes side-by-side comparison almost automatic. Professionals who review these disputes for a living often recommend matching filenames and angles between the two sets, since it lets a landlord, mediator, or judge compare "before" and "after" images in seconds rather than trying to reconstruct context from memory.
Photograph every difference you notice, even small ones, and be honest with yourself about what changed versus what was already there. If you caused genuine damage, documenting it clearly and proposing a fair repair cost upfront often works out better than waiting for your landlord to itemize it themselves; disputing an inflated repair estimate is much easier when you already have your own photo-backed assessment to counter it with.
If you're the landlord or property manager reviewing the move-out yourself, an itemized deduction statement should list each item of damage, a brief description, and the actual or estimated repair cost, ideally backed by an invoice or receipt if the work has already been done or quoted. Vague line items like "cleaning fee" or "general damage" invite disputes; specific ones like "kitchen counter burn mark repair, $85, per attached vendor quote" rarely do.
Before you hand back the keys, run through this final checklist:
- Return all keys, fobs, and garage remotes and get written confirmation they were received
- Record final utility meter readings the same day you vacate
- Provide your forwarding address in writing so the deposit and any statement can reach you
- Confirm your state's deposit-return deadline and mark your calendar to follow up if it passes
How Professional Property Managers Handle Move-In Inspections
Individual tenants and landlords can absolutely run a solid move-in inspection with a printed checklist and a phone camera. But owners managing multiple units, or even just one property from a distance, face a different problem: consistency. A single missed photo, an unsigned form, or a walkthrough that got rushed during a busy week can turn into a costly dispute months later.
That's the gap that a managed approach closes. At Milwaukeepm, scheduled walkthroughs happen as a standard part of every tenant handoff, not as an afterthought squeezed in between showings. Documentation from each inspection gets stored in the tenant portal, so both the owner and the tenant have permanent access to the same signed record, with no risk of a photo getting lost in someone's camera roll or a signature getting forgotten in the move-in rush.
This structure matters most during turnovers, when the pressure to get a unit re-rented quickly can tempt anyone to skip steps. A thorough pre-occupancy walkthrough that's documented the same way every time, whether it's a single-family home or a multifamily unit, gives owners a defensible paper trail without requiring them to personally show up for every move-in across their portfolio.
For owners juggling several properties or living out of state, this consistency is often the real value of hiring a manager. It's not that a DIY checklist doesn't work. It's that maintaining the same rigorous documentation on unit after unit, tenant after tenant, without a single missed step, is difficult to sustain alone. Pairing solid tenant screening with disciplined move-in documentation reduces the odds of a dispute reaching the deposit stage at all.
What Actually Protects Your Deposit (and What's Overrated)
Most advice on this topic treats the checklist itself as the hard part. It isn't. Filling out a form takes fifteen minutes. The part people skip is the boring, unglamorous follow-through: getting a second signature, emailing the package the same day, and actually storing the files somewhere you'll find them eight months later when you need them.
I'd argue the single most overrated piece of advice in this space is "take lots of photos." Volume without organization is nearly as useless as no photos at all. Fifty unlabeled images from move-in day, sitting in a camera roll and mixed in with vacation pictures, won't help you when you're trying to prove a specific carpet stain existed on day one. A narrated video, a dozen well-labeled photos matched to checklist line items, and one signed document beat two hundred random shots every time.
If you take away one thing, make it this: treat the signature and the delivery timestamp as more important than the photos themselves. Evidence that never reached the other party, or that no one can prove was created on move-in day, is weaker than evidence that landed in an inbox with a date stamp attached. A managed process, whether you build it yourself or an owner hires it out, wins on consistency, not cleverness.
— Chaim
Hire It Out: How Milwaukeepm Handles Move-In Documentation for You
If you own rental property and the idea of personally photographing every outlet and cabinet across multiple units sounds like a part-time job you never signed up for, that's exactly the gap Milwaukeepm exists to close. Instead of relying on a printed form and your own memory to hold up months later, Milwaukeepm builds signed, dated inspection records into every tenant handoff and stores them in the owner and tenant portal automatically.
Milwaukeepm's full-service property management covers the entire tenant lifecycle: marketing and screening, lease administration, maintenance coordination through preferred local vendors, and unit turnovers handled by people who do this every week, not once a year. If a tenant placed within the first year doesn't work out, Milwaukeepm's 12-month tenant guarantee means the unit gets re-rented without an additional placement charge, so a documentation gap or a bad screening decision doesn't cost you twice.
Compare the DIY route against a managed one for yourself. Full pricing, including the monthly management fee and tenant placement costs, is posted openly, and getting a quote for your specific property takes just a few minutes.
Where to Download the Official Checklists and Forms
Every template mentioned in this guide comes from a source you can trust and download directly, without handing over an email address to a random landing page.
- HUD's Appendix 5 form is the government-backed Move-In/Move-Out Inspection Form, a free, printable template that covers every major room category and works for nearly any rental situation.
- Zillow's Rental Move-In and Move-Out Checklist offers a clean, downloadable PDF template designed for same-day use right after you get your keys.
- DepositHawk's fillable inspection form lets you build a digital record with attached photos and a signature line, without printing or scanning anything.
- ClearLegalTips' move-in and move-out guide walks through a full checklist template alongside state-by-state deposit timeline examples.
- University housing offices, such as Salisbury University's published checklist, offer a good real-world example of how room-by-room forms get structured in practice.
Sources
- Appendix 5: Move-In/Move-Out Inspection Form
- Free Move-In/Move-Out Inspection Checklist — Download PDF | DepositHawk
- Move-In Move-Out Checklist: Free Rental Template (2026)
FAQ
What Should Be Included in a Move-In Inspection Checklist?
A complete checklist covers every room, including entry, living areas, kitchen, bathrooms, bedrooms, and shared or exterior spaces, with specific notes on walls, floors, appliances, fixtures, and locks. It should also record utility meter readings, key and fob counts, and space for both the tenant's and landlord's signatures.
How Soon After Moving In Should I Complete the Inspection?
Complete your inspection and photos on move-in day, ideally before you unload a single box, since Zillow's guidance recommends documenting condition within the first 24 hours. Waiting even a few days makes it harder to argue that any marks you find weren't caused by your own move-in process.
What if My Landlord Refuses to Sign the Checklist?
Complete the checklist yourself, photograph and video every room thoroughly, and note the refusal directly on the form with the date and any attempts you made to involve them. Send the complete package by email and certified mail the same day so you have a timestamped delivery record even without a countersignature.
How Long Does a Landlord Have to Return My Deposit?
Deadlines vary by state, with examples ranging from 14 days in New York to 21 days in California and 30 days in Texas for returning the deposit or providing an itemized statement. Always confirm your specific state's current requirement rather than relying on another state's timeline.
Should I Hire a Property Manager to Handle Move-In Inspections?
If you own multiple units or live far from your rental property, a managed service like Milwaukeepm builds signed, photo-documented inspections into every tenant handoff and stores the records in a shared portal automatically. Current pricing for monthly management and tenant placement is available directly on the site.